I was asked if I could cut a quick video on the installation and configuration for ForgeRock OpenAM 13. While I had done a similar video on an earlier version of OpenAM and that the procedure by and large remains the same, I used this opportunity to get over my laziness. Here’s the video:
Tag: OpenAM
ForgeRock Unveils Preview of Cloud Foundry Service Broker
Addendum to ForgeRock Full Stack Configuration – Using ForgeRock OpenIG
This is an extension of an earlier post that demonstrated ForgeRock Full Stack Configuration, comprising OpenDJ, OpenAM and OpenIDM. In here we’ll plug in ForgeRock OpenIG to route traffic to/from OpenAM and OpenIDM. In the video log that follows, you’ll see:
– All urls that hit OpenIG, containing a string ‘openam’ getting redirected to OpenAM URL
– All urls that hit OpenIG, that does not contain the string ‘openam’ getting redirected to:
- OpenAM for Authentication if there is no valid User session and then on to OpenIDM UI
2. OpenIDM UI if there is a valid User sessionOpenIDM UI
So here’s the extended illustration

Now on to the video.Enjoy!
ForgeRock OpenAM – Configuring Different Realms to Use Different BaseDNs of an OpenDJ Instance as Identity Repository
The short video log that follows was prepared to answer a question raised in the Forum on the ForgeRock Community Website. It’s an easy one on how to configure two separate BaseDNs of single ForgeRock OpenDJ instance as Identity Repository for two separate Realms in ForgeRock OpenAM.
Enjoy!
Theming a ForgeRock OpenAM 13 Realm XUI
Interested to know how a ForgeRock OpenAM 13 Realm XUI was dressed up like the way it is in the picture below, take a look at twelve minute long video log embedded on this post:

Enjoy!
Customizing ForgeRock OpenAM 13 XUI Login Page
Want to know what files are to be modified behind the hood to change the look and feel of ForgeRock OpenAM 13 XUI Login Page, take a look at my Video log:
Enjoy!
ForgeRock Full Stack Configuration
If you’re in a hurry to know what each of the ForgeRock Identity Platform Components is meant to do, try the Full Stack Configuration. In just over fifteen minutes, you’ll see:
– Installation of ForgeRock OpenDJ
– Deployment of ForgeRock OpenAM
– Configuration of OpenDJ as an Identity Repository in ForgeRock OpenAM
– Installation of ForgeRock OpenIDM
– Configuring OpenDJ as External Resource in OpenIDM
– Running a reconciliation in OpenIDM from OpenDJ
– Provisioning a User from OpenIDM to OpenDJ
– Using OpenAM as the Authentication Module for OpenIDM
With a much awaited weekend around the corner, I couldn’t really get over the laziness to create a better illustration than the one below to help visualize what’s mentioned above.

Please watch it, if you have some time. Enjoy!
Thanks: ForgeRock Product Documentation
ForgeRock OpenIG 4 As OpenAM Policy Enforcement Point
We know of it as a job usually done by the OpenAM Web/J2EE Policy Agent to enforce a Policy Decision sent by the Access Management Solution. To help you recollect, this is how it works:
– An End User tries to access a resource (say, a URL)
– The Web/J2EE Policy Agent deployed in the Container, intercepts the requests and redirects the request to Access Management Solution
– The Access Management Solution, first Authenticates the User, does a redirection to the the Resource (URL), where Agent would again receive it
– The Agent would now ask the Access Management Solution whether the Authenticated User has access to the Protected Resource (Authorization)
– Based on the policies defined in the Access Management Solution for the Protected Resource, it constructs a Decision and sends it back to the Agent
– Whatever the decision Agent receives from the Access Management (whether to ALLOW or DENY access to the Protected Resource), the Agent Enforces it!
The story in the video below is a bit different. In fact, the protagonist is different. The honours of Enforcing a Policy Decision sent by OpenAM is on ForgeRock OpenIG 4. As for the flow, it by and large remains what is mentioned above, just that the OpenIG uses its Route Configuration file to decide whether it should redirect the Client requests to OpenAM (should the SSO Cookie is absent in the request), ask OpenAM for Policy Decisions on Protected URLs by Authenticated Users and finally to enforce a Decision that is sent by OpenAM (whether to ALLOW or DENY access to Protected URLs).
Very roughly, here’s an illustration of the flow:

To see it in action, watch the screen-cast below. Enjoy!
Related Documentation:
– ForgeRock OpenIG Documentation
MySQL As Credential Repository in ForgeRock OpenAM 13
If it perplexes you the difference between an Identity Repository and an Authentication Repository (a.k.a Credential Repository) in ForgeRock OpenAM, maybe the video tutorial on this post can render some hint. It’s basic, so shouldn’t be difficult to understand, if you don’t know it already. Before getting to the video, let me mention here a couple of points:
OpenAM has the following repositories:
– Configuration Repository where the OpenAM Configuration Data is stored
– Identity Repository where the User Profiles are stored
– Authentication Repository or Credential Repository used by the ForgeRock to validate a User Credential
In the demonstration that follows, OpenAM connects to a MySQL Database for authenticating a User (Credential/Authentication Repository) and pulls up the User’s profile from an embedded OpenDJ instance (Identity Repository). If the User’s profile does not exist in the Identity Repository, OpenAM dynamically creates it.
Now on to the video. Enjoy!
ForgeRock OpenIG 4 – Getting Credentials from ForgeRock OpenAM 13
Interested to see how ForgeRock Identity Gateway orchestrates with the ForgeRock Access Management solution to replay a User Credential on to a Legacy Application giving him/her access to it? There’s a screen-cast right below this write up. I had already posted a couple of entries on this space, demonstrating how OpenIG fetches User Credentials from different Datastores like a CSV file and a JDBC Database. While it’s not a prerequisite to know it before viewing the Video below, it might help get a good grip on the steps performed. So if you haven’t come across those blog entries yet, here it is:
– ForgeRock OpenIG 4 – Getting Credentials from File Datastore
– ForgeRock OpenIG 4 – Getting Credentials from Database
What to expect in the video?
– A user tries to access ‘http://openig.mydomain.com:8080/replay’ url
– A Java EE OpenAM Policy Agent sitting in front of the ‘http://openig.mydomain.com:8080′ url intercepts the request from the client (user’s browser) and redirects the request to ForgeRock OpenAM (http://openam.mydomain.com:8080/openam)
– ForgeRock OpenAM will send the OpenAM Login Page back to the user
– The user supplies the credential, which the OpenAM verifies. If authentication is successful,OpenAM adds the username of the user and his/her encrypted password to the session and sends it to Java EE Policy Agent
– Java EE Policy agent validates the user’s session, gives control to OpenIG.
– Because the URL that the client requested for (http://openig.mydomain.com:8080/replay), matches a specific route (say 04-route.json) configured in OpenIG, it applies the filters in the route configuration file. The first filter will use a shared key (also known to the OpenAM) to decrypt the encrypted password sent by OpenAM. The second filter will retrieve the username and password from the exchange and replaces your browser’s original HTTP GET request with an HTTP POST login request that contains the credentials to authenticate and the third filter will remove the username and password headers before continuing to process the exchange.
– The HTTP server validates the credentials and respond back to OpenIG with user’s profile page
– OpenIG sends that response to the End user
Note: OpenAM in our setup is configured to process a ‘Password Replay’ Java Class on successful authentication. The Java EE agent in OpenAM is configured only for Single Sign On (SSO) and is configured to add the UserToken (username) and sunIdentityUserPassword (password) as session attributes in HTTP header. And the FQHN of OpenAM deployment in the Video demonstration is ‘idp.mydomain.com’ and not ‘openam.mydomain.com’
To satisfy your Visual Cortex, here’s an illustration of the steps above:

Now on to the step by step configuration. Enjoy!
Related Documentation / Video:
– ForgeRock OpenIG Documentation
– Screncast on ‘ForgeRock OpenIG 3.x : Getting Credentials from OpenAM‘
ForgeRock OpenAM 13 User Self Service
ForgeRock’s recently released newer version of its Access Management solution offers many new and improved User Self Service experience. It’s all self-explanatory in the video embedded below. Please take a look, when you’ve ten minutes:
Enjoy!
ForgeRock Authenticator (OATH) in ForgeRock OpenAM 13
If you’re in possession of a Smart Phone that runs either the Apple iOS or Android, you may probably be interested to know that the ForgeRock’s newer version of its Access Management solution now has an Authenticator App for you. Once installed and the device registered with ForgeRock OpenAM 13, one could use this Mobile App to generate One Time Password to validate his/her identity and thereby gain access to resources protected by the OpenAM. Needless to add, the ForgeRock Authenticator Mobile App is available on Apple iTunes Store for the iOS users and the Google Playstore for the Android fans.
Once installed, you’ll see on your phone something close to what is in the picture below:

Here’s what I did with my copy of ForgeRock Authenticator App on my iPhone:
– Configured an Authentication Chain ‘myAuthChain’ in my OpenAM 13 instance
– The said chain consisted of two Authentication Modules namely DataStore & ForgeRock Authenticator (OATH)
– When a subject authenticates against the ‘myAuthChain’ Authentication Chain in OpenAM, he/she is prompted for the DataStore credentials (an embedded OpenDJ instance), which on success is followed by another prompt where the user can register his/her device (using QR Code), generate an OTP that can be used to gain access to the resources protected by OpenAM.

If you are interested to see all of this in action, please spare five minutes to watch the video below.
Enjoy!
Related documents/videos:
– ForgeRock Documentation
– Smart Security Using Phone App Demo
Using SAML Assertion Attributes in ForgeRock OpenAM – Concluding Episode: Using SAML Assertion Attributes
You’ve reached the concluding episode of a four part video made on using SAML v2 Assertion attributes in an application protected by ForgeRock OpenAM. I don’t need to mention that this being the last one in the lot, it may seem pointless to read/view this entry independently without going through the entries below, preferably in the exact same order as is listed:
1. Protecting a J2EE Application with ForgeRock OpenAM
2. Configuring Federation in ForgeRock OpenAM
3. Configuring Transient Federation in ForgeRock OpenAM
4. Using SAMLv2 Assertion Attributes
We can safely say that the diagram below is the end state of our demonstration:
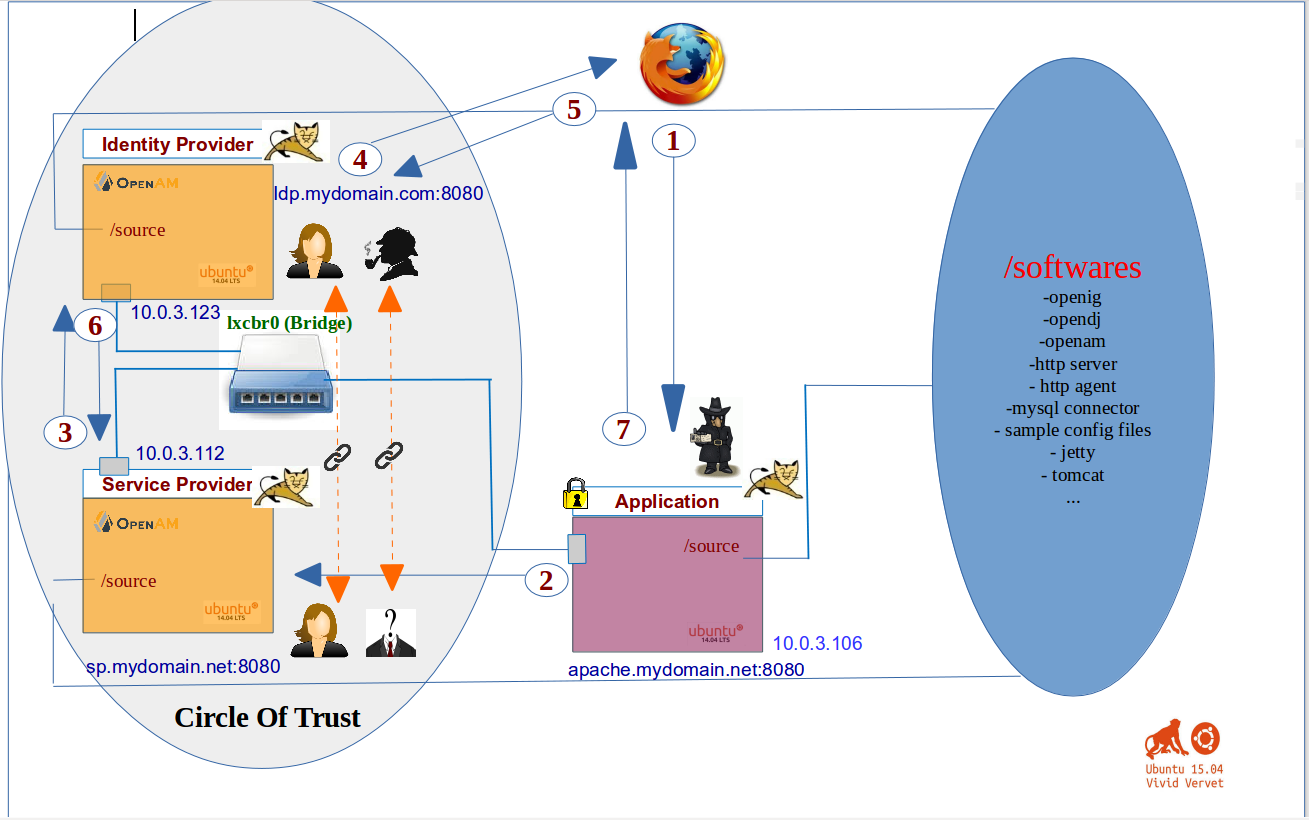
So what we’ve in there is a client attempting to access the protected J2EE Application, which is intercepted by the OpenAM Policy Agent, who in turn redirects the request to an IDP initiated SSO URL, resulting in a Login page to the end user from IDP. The IDP would then validate the credentials supplied by the end user, and if found authentic, sends an assertion to the SP with the user attributes (like mail, telephonenumber) specified in the Federation Configuration. Because it uses Transient Federation, the user will not have a profile in SP, still the attributes in the Assertion is available in the user’s session to be used by the Agent to pass on to the application. It may have sounded complicated, but I’m confident that the concluding episode of a rather lengthy screen-cast can help you figure it all.
I want to take a moment to Thank you! to have spent time reading/viewing my web logs on ‘Using SAML Assertion Attributes’ and sincerely hope it was useful.
Enjoy!
Using SAML Assertion Attributes in ForgeRock OpenAM – Episode 03/04 : Configuring Transient Federation in ForgeRock OpenAM
This is the third episode from a four part video made on using SAML v2 Assertion attributes in an application protected by ForgeRock OpenAM. In the interest of continuity and also to get the context accurately, it may make sense to read/view the blog posts in the following order:
1. Protecting a J2EE Application with ForgeRock OpenAM
2. Configuring Federation in ForgeRock OpenAM
3. Configuring Transient Federation in ForgeRock OpenAM
4. Using SAMLv2 Assertion Attributes
Let me throw a picture at you:

The diagram is a slightly modified version of the one that you would have seen in my earlier blog entry. It has one additional user in the Identity Provider (which of course seems like a world famous detective and that’s no coincidence), but no corresponding entry in the Service Provider. In the Identity Federation Configuration earlier, we saw how a user with an id ‘demo’ in the Identity Provider linked her account with her id in the Service Provider. But there can be situations, when we may want to use Federation with identities only at the IDP, still gaining access to the applications protected by the SP. That’s where Transient Federation comes into play. It maps the identities from IDP to an anonymous user in the SP (many to one mapping).
Enjoy!
Using SAML Assertion Attributes in ForgeRock OpenAM – Episode 02/04 : Configuring SAML 2.0 Federation in ForgeRock OpenAM
This is the second entry from a series of four blog entries made around using SAML v2 Assertion attributes in an application protected by ForgeRock OpenAM. Reading/viewing this as an independent entry may not be a futile exercise, but it may seem more effective if the following order is followed while going through this topic:
1. Protecting a J2EE Application with ForgeRock OpenAM
2. Configuring Federation in ForgeRock OpenAM
3. Configuring Transient Federation in ForgeRock OpenAM
4. Using SAMLv2 Assertion Attributes
At end of this episode, the following is what you get:

So the diagram above shows a Circle of Trust established between two entities (an Identity Provider and a Service Provider), each of which is an OpenAM instance running in two different Linux Containers. In this scenario, a user (with id ‘demo’) has profile in both IDP and SP, and by virtue of Identity Federation, she manages to link those accounts, after which once she authenticates against the IDP, IDP can send a assertion to SP, validating the authenticity of the user.
Enjoy!
Using SAML Assertion Attributes in ForgeRock OpenAM – Episode 01/04 : Protecting a J2EE Application with ForgeRock OpenAM
This is first of four blog entries that aims at demonstrating how to use SAML Assertion Attributes in an Application protected by ForgeRock OpenAM. For the convenience of viewing, a thirty five odd minutes screen-cast has been split into four sections, the first of which is embedded on this blog post. While each entry talks of an independent facility in ForgeRock OpenAM, it makes sense to read/view them in the following order:
1. Protecting a J2EE Application with ForgeRock OpenAM
2. Configuring Federation in ForgeRock OpenAM
3. Configuring Transient Federation in ForgeRock OpenAM
4. Using SAMLv2 Assertion Attributes

As you can possibly make out from the illustration above, there are three Linux Containers being used in our demonstration, two of which runs an OpenAM instance each. A third Linux Container is used for installing a J2EE Application. The illustration captures the end state of this segment, where a J2EE Application is protected by an OpenAM J2EE Agent, making sure all client requests to it are intercepted by the Agent and redirected to the OpenAM for Authentication/Authorization.
Enjoy!
Distributed Authentication in ForgeRock OpenAM
Let me start with a word of caution. I made a screen-cast to demonstrate the Distributed Authentication in ForgeRock OpenAM and you’ll find the same embedded on this post. Some of my actions in there are questionable and should never be attempted even in a development environment, such as setting a URL in the OpenAM Administration Console to redirect to after a Successful Authentication. This video demonstration is solely intended to give a hint on the positioning of Distributed Authentication UI in OpenAM Deployment Topology, but several other things like Network/Firewall configuration, Post Authentication Processing that goes hand in hand with the Distributed Authentication in OpenAM was beyond the scope of this short screen-cast. I really hope you get an idea on what the Distributed Authentication in OpenAM is expected to achieve.
The following illustration might give you an idea on what’s demonstrated in the video. We have a client network who cannot (or who is not supposed to) access the OpenAM Server in a different Network directly (say for Security reasons). So in a Demilitarized Zone (DMZ) or Perimeter Network, we have a Server that offers a Distributed Authentication UI to the clients from the ‘untrusted network’. That way, the clients get to see the UI of OpenAM by access the Server in DMZ, who would in turn talk to the OpenAM Server through a trusted channel. As one can imagine, Network Configuration like Firewall plays an important role in a deployment scenario, but sadly that’s all beyond the scope in our mini demonstration.

So if you have ~10 minutes to spare, watch it
Enjoy!
Thanks: ForgeRock Documentation on OpenAM
MySQL Database as Identity Repository for ForgeRock OpenAM
ForgeRock OpenAM has three types of repositories:
(i) Configuration Repository that stores the OpenAM configuration data (ForgeRock OpenDJ)
(ii) Authentication Repository that’s used by OpenAM to Perform User Authentication (has more than 20 options out of the box)
(iii) Identity Repository that stores the User Profiles (has several options like LDAP v3, OpenDJ, AD, IBM’s Directory Server and Database [Eary Access])
Someone asked me the details on configuring a Database as the Identity Repository for ForgeRock OpenAM, so as soon as I got a chance, created the following screen-cast to demonstrate the use of MySQL Database as an Identity Repository for ForgeRock OpenAM. It’s fairly straightforward.
Enjoy!
ForgeRock OpenAM Deployment Training in Bangalore, India
Just yesterday, I concluded a five day ForgeRock University training program on ForgeRock OpenAM at Bangalore. I wish to express my sincere gratitude to each one in the picture below for showing up for a ForgeRock University course on our Access Management solution and wish them success in their ForgeRock Projects.

To know what we discussed during the training or to subscribe for one such program, all details are here.
If you aren’t looking for a detailed program on our Products as the one you find in the link above, we do offer half a day free (as in beer) overview session on both ForgeRock OpenAM and ForgeRock OpenIDM, the details of which are below (keep checking the links below for the next occurrence):
–ForgeRock OpenAM Product Overview
–ForgeRock OpenIDM Product Overview
Lastly, if you are keen to validate/demonstrate your skills in ForgeRock OpenAM, check out ForgeRock Certified OpenAM Specialist Exam.
Again, to all my friends who dropped by for the OpenAM training, thanks for all the fun and learning.

Provisioning Users in ForgeRock OpenAM Using Social Login
I had left a task unfinished yesterday. When I published my previous post on to my little space in the blogosphere, I kept aside a crucial piece of information. If you haven’t read/viewed my earlier blog on ForgeRock OpenAM Social Authentication (Facebook) Using OAuth2 and don’t know how to configure OAuth2 Authentication Module in ForgeRock OpenAM, I’d request you to first take a look at it.
And now here’s the missing thread: in the last video, we authenticated the OpenAM users against their Facebook Account, but then they had their profile available in the OpenAM Identity Repository as well, which only meant that on Successful Authentication with Facebook, if the users did not have their profile in OpenAM, they were not let in. We take a different stand this time around allowing in even those users without an OpenAM profile, by having OpenAM provision their accounts in its Identity Repository using the attributes returned by Facebook on successful authentication.
Enjoy!
ForgeRock OpenAM and Social Authentication (Facebook) using OAuth2
The video demonstration embedded below this write-up is dangerously similar to the video here , published more than three months ago. I’ve had challenges making this one though, which is when my colleagues Jon Knight and Albert Ayoub stepped forward to lend a helping hand. So if you ready, let’s see how ForgeRock OpenAM lets a user authenticate against his/her Facebook account to gain access to OpenAM (read applications protected by OpenAM).
Enjoy!
There is a very useful article around this right here.
ForgeRock OpenAM Federation Using SAML v2
If you experience Deja Vu by looking at the illustration just below, chances are that you’ve hit my blogs before, in particular on this entry, where we looked at ForgeRock OpenAM as an Identity Provider and ForgeRock OpenIG as a Service Provider.
A friend asked me if I could demonstrate a very simple configuration of Federation using two ForgeRock OpenAM instances, one acting as an Identity Provider (a.k.a IDP) and another one taking up the role of a Service Provider (a.k.a SP). It wasn’t difficult to do one, so here we have it embedded towards the end of this post.

So what do we have here:
– A Circle of Trust which has two OpenAM instances, one of which acting as an Identity Provider and another one as Service Provider
– User always authenticates against the Identity Provider
– The authentication process is intiated either by the IDP (known as IDP initiated SSO) or by the SP (SP initiated SSO)
– Once the user is authenticated successfully, IDP sends across a piece of security information to the SP (known as assertion) that could contain user attributes
– SP then gives the user access to protected resources
In the demonstration that follows, because ‘Auto Federation’ is not enabled, during the first login the user will be prompted for credentials both by the IDP and the SP. Once the account linking is done, it’s only the IDP who would challenge the user.
If the illustration and the briefing above hasn’t given you the complete picture, the video below might give a better one.
Enjoy!
ForgeRock OpenIG as SAML 2.0 Service Provider
This post is based on the ForgeRock Documentation on configuring OpenIG as SAML 2.0 Service Provider. The video logs embedded just below this write up is a visual representation of what is already there in the document that I mentioned above. For a detailed study, please read through the documentation and then sit back, relax and watch the demonstration in the screen-cast below
SAML 2.0 as you probably know is a standard to exchange information between a SAML authority (a Identity Provider a.k.a IDP) and a SAML Consumer (a Service Provider a.k.a SP). In the demonstration that follows ForgeRock OpenAM acts as an Identity Provider and ForgeRock OpenIG acts as a Service Provider. So the authentication of a user is done by the IDP, who will then send a piece of information (Assertion) to the SP that could contain the attributes of user from the user’s profile in the IDP DataStore. SP will then use the information thus obtained (Assertion) to take further action (like giving access to the user etc.)
There are two ways of getting this done:
(i) SP initiated SSO
(ii) IDP initiated SSO
In simple words, in a SP initiated SSO, the user contacts the Service Provider, who in turns gets in touch with the Identity Provider, who would validate the user credentials and then exchange a piece of information (Assertion) that could contain the user attributes to the Service Provider. Whereas a IDP initiated SSO, the IDP will authenticate the user, and would then send an unsolicited message (Assertion) to the SP, who would then take further action (like giving access to the user etc.)
The following two illustrations might give a rough idea:

In our story (above in the illustration and below in the video), a user authenticates against ForgeRock OpenAM (IDP), who will send then an assertion (containing user’s mail and employeenumber attribute) to ForgeRock OpenIG (Service Provider), who will apply filters (like extracting the attributes from assertion and posting it as username and password) to post the user’s credentials to a protected application (Minimal HTTP Server)
If you’ve got a vague picture on what’s discussed above, I’d believe it’ll be clearer after watching the video below:
Enjoy!
User Self Registration in ForgeRock OpenAM Concluding Part – Using REST
In an earlier post, we saw User Self Registration in ForgeRock OpenAM using XUI. It’s likely that you may not want to use the UI that comes with OpenAM, but may have reasons to build your own UI/Application on the REST API to operate on ForgeRock’s Access Management Solution. Keeping that in mind, a discussion on User Self Registration in OpenAM is incomplete without showing you how it is done using REST. Like many other examples you may already be familiar with around REST calls to ForgeRock products, you’ll see the usage of simple, yet powerful ‘curl’ to invoke REST calls to OpenAM for Self Registering a User. Here’s a list of related video blogs that you may want to watch before watching the one that’s embedded below.
– User Self Registration in ForgeRock OpenAM Part I – Using XUI
– E-mail Service Configuration in ForgeRock OpenAM
If you are ready, let’s go:
User Self Registration in ForgeRock OpenAM Part I – Using XUI
ForgeRock OpenAM is not meant for User Provisioning. Consider, ForgeRock OpenIDM for the same. Still, OpenAM does offer a facility for User Self Registration. In this segment, let’s have a look at how it’s done using the User Interface of OpenAM (XUI). As you can guess, it’s not a difficult task at all. Have a look.
Before I forget, the E-mail Service needs to be configured in OpenAM for the User Self Registration to work, so if you don’t know how that’s done, we have another video here.
Enjoy!
E-mail Service Configuration in ForgeRock OpenAM
In a less than 2 minute video that follows, you’ll see me setting up E-mail service in ForgeRock OpenAM, a facility that is used by OpenAM features such User Self Registration. Because I know for certain I’ll have to refer to this video on a number of occasions in future while demonstrating other capabilities of OpenAM, I’ve decided to keep this video tutorial separate and independent. It’s tiny, of course:
Enjoy!
ForgeRock Certified OpenAM Specialist Exam | FRX-AM-CSE
All those who are interested to validate their skill in ForgeRock OpenAM may want to attempt the newly released ForgeRock Certified OpenAM Specialist Exam.
ForgeRock OpenAM Multi Factor Authentication Using Adaptive Risk Authentication Module & OTP
In this episode, you’ll see ForgeRock OpenAM’s two factor authentication feature employing it’s Adaptive Risk Authentication Module instance and HOTP module instance
So in the video demonstration that follows this post, you’ll see a user attempting to login against an Authentication Chain (say ‘MyAuthChain’) which has three module instances namely (i) Data Store, (ii) Adaptive Risk and (iii) HOTP. If the user is able to supply the right credentials against the Data Store, he or she is allowed in without any further challenge. On the other hand, if the the attempt to authenticate against the first Module instance (Data Store) fails, then the user is prompted for additional credentials like One Time Password.
The following illustration might give a rough idea on the what’s discussed above and the video that follows might make it pretty clear.

Enjoy!
ForgeRock OpenIG as OAuth 2.0 Resource Server
First things first, screen-cast that follows this write up is based on the ForgeRock documentation on OpenIG that’s found here. Secondly, if you aren’t familiar with ForgeRock OpenIG or ForgeRock OpenAM, I’d recommend you to do some reading on the products from the official ForgeRock documentation or watch the following screen-casts on it to become familiarized with it:
ForgeRock OpenIG
– ForgeRock OpenIG Installation
– ForgeRock OpenIG: Getting Credentials from a File Data Store
– ForgeRock OpenIG: Getting Credentials from a JDBC Data Store
– ForgeRock OpenIG: Getting Credentials from ForgeRock OpenAM
ForgeRock OpenAM
– ForgeRock OpenAM Installation & Configuration
– Creating Realm in OpenAM and Setting Up OpenDJ as a Data Store
– ForgeRock OpenAM Authentication With Google Account Using OAuth2
– ForgeRock OpenAM High Availability Deployment
– Configuring Database as OpenAM Log Type
– ForgeRock OpenAM 12: Switching from XUI to Legacy UI
– Adding User Profile Attribute in ForgeRock OpenAM
Cut to present, we have OpenIG acting as a resource server. So in the video log, you’ll see the curl command being used to contact OpenAM to get an Access Token, use the same command to contact OpenIG with the Access Token, which is when OpenIG (acting as a resource server), will contact OpenAM (acting as an authorization server) for validating the token. Once validated, OpenIG will apply additional filters to post the credentials to a HTTP Server and get the user profile in response to it. A one-liner definition for the mouthful of jargon I used above can be found here. The illustration below might make the long story said above slightly shorter.

Now to the real action:
Adding User Profile Attribute in ForgeRock OpenAM
In my earlier blog post titled Extending the ForgeRock OpenDJ Schema there was an embedded screen-cast that demonstrated how a new attribute could be added to the user profile in OpenDJ. We take one step further in this section to modify at Service in ForgeRock OpenAM to display that attribute in OpenAM Console. So if you’ve watched or if you know how to extend the OpenDJ schema to add a new user attribute, the following video log will tell you what you need to do on OpenAM to display it in the console.
Enjoy!
ForgeRock OpenAM 12: Switching from XUI to Legacy UI
It’s a weekend, so I don’t seem to have the mental bandwidth for a heavy duty demonstration on ForgeRock products. I’ve a very short video log that has a running time of just over a minute and half to show you how, if required, you can switch from ForgeRock OpenAM 12 XUI (default interface) to OpenAM Legacy UI.
Enjoy!
ForgeRock OpenIG: Getting Credentials from ForgeRock OpenAM
In this episode, you’ll see how ForgeRock OpenIG picks up user credentials from ForgeRock OpenAM, and gives the user access to an application. Now that’s quite a bit of information in a single line. So let’s break it down into pieces:
– A user tries to access ‘http://openig.mydomain.com:8080/replay’ url
– A Java EE OpenAM Policy Agent sitting in front of the ‘http://openig.mydomain.com:8080’ url intercepts the request from the client (user’s browser) and redirects the request to ForgeRock OpenAM (http://openam.mydomain.com:8080/openam)
– ForgeRock OpenAM will send the OpenAM Login Page back to the user
– The user supplies the credential, which the OpenAM verifies. If authentication is successful,OpenAM adds the username of the user and his/her encrypted password to the session and sends it to Java EE Policy Agent
– Java EE Policy agent validates the user’s session, gives control to OpenIG.
– Because the URL that the client requested for (http://openig.mydomain.com:8080/replay), matches a specific route (say 04-route.json) configured in OpenIG, it applies the filters in the route configuration file. The first filter will use a shared key (also known to the OpenAM) to decrypt the encrypted password sent by OpenAM. The second filter will retrieve the username and password from the exchange and replaces your browser’s original HTTP GET request with an HTTP POST login request that contains the credentials to authenticate and the third filter will remove the username and password headers before continuing to process the exchange.
– The HTTP server validates the credentials and respond back to OpenIG with user’s profile page
– OpenIG sends that response to the end user
A couple of things though: OpenAM in our setup is configured to process a ‘Password Replay’ Java Class on successful authentication. The Java EE agent in OpenAM is configured only for Single Sign On (SSO) and is configured to add the UserToken (username) and sunIdentityUserPassword (password) as session attributes in HTTP header.
The picture below may not speak thousand words, but it does speak all the words I uttered above:

If you’re new to ForgeRock OpenIG, I recommend viewing screen-casts at the following links first:
– ForgeRock OpenIG Installation & Configuration
– ForgeRock OpenIG: Getting Credentials from File Data Source
– ForgeRock OpenIG: Getting Credentials from JDBC Data Source
The following video would not have been possible, but with the help of ForgeRock Documentation.
Enjoy!
Setting Up ForgeRock OpenAM with HTTPS on Tomcat
This post is a demo version of the ForgeRock Documentation on Setting Up OpenAM with HTTPS on Tomcat. I had earlier published a screen-cast on the ForgeRock OpenAM deployment and Configuration on a Apache Tomcat Container running in a LXC. If you haven’t watched it yet, and would like to have a look at it, it’s right here. Below you’ll find the steps that I run in my Ubuntu Linux Container to secure our OpenAM deployment:
– Create a Certificate & store it in keystore in a Linux Container
– Modify the Tomcat Server Configuration file (server.xml) to enable SSL (on port 8443)
– Deploy ForgeRock OpenAM
– Access OpenAM from the host OS and complete the configuration
If it’s hard for your visualize how the infrastructure looks like, here’s an illustration to make life easy.

Now on to the action:
ForgeRock OpenAM Deployment Session in Bangalore, India
A brilliant five day training on ForgeRock OpenAM by Matthias Tristl is reaching its conclusion today in Bangalore. Well, if you want to know what we learned on OpenAM in five days, the details are here. Have a look at the ForgeRock University page for other interesting programs.
Thank you Matthias, we had a lot of learning & fun:


ForgeRock OpenIDM REST Interface
I’ve already posted some entries around the ForgeRock OpenIDM, direct links to which are appended below in case you are interested:
– ForgeRock OpenIDM Installation In a Linux Container”
– ForgeRock OpenIDM Integration with ForgeRock OpenDJ
– Setting up ForgeRock OpenIDM with MySQL
– Configuring ForgeRock OpenIDM in a Cluster
The following video log is a very light one, partly because I haven’t done a video on REST interface around OpenIDM, but have done similiar ones for both OpenDJ and OpenAM, and partly because I’m feeling too sleepy to do a screen-cast on tougher topics. Talking of REST, in case if you haven’t seen my earlier reference to a neat and curt introduction to ForgeRock Common REST API, read it here.
Again, for those who are not familiar with REST calls to OpenIDM, the embedded video below might just give an idea of how to create a user and fetch a user profile in OpenIDM using REST.
Configuring Database as OpenAM Log Type
That the ForgeRock OpenAM audit logs are extremely important is an understatement. By default, OpenAM uses flat files as log output format, but there does exist an option to configure OpenAM to generate audit logs onto a database. And when a friend today raised a question around it, I thought I should make a screen-cast on it, which is what you would find embedded below.
A bit about the system used for the screen-cast. I’m running two Linux Containers (Ubuntu 14.04.2 LTS), one of which has OpenAM installed & configured and the other container running an instance of MySQL database. Rest of the story should be straightforward in the video.
Special Thanks: David Goldsmith
ForgeRock OpenAM High Availability Deployment
A video demonstration on ForgeRock OpenAM deployment as a standalone instance in a Tomcat Server was posted earlier on my blog. For a production ready environment, it is important to have multiple instances of OpenAM running in a site. In the video that’s embedded below, you’ll get to see:
– An existing deployment of ForgeRock OpenAM in a Linux Container
– Installation & Configuration of a new instance of ForgeRock OpenAM in a separate Linux Container joining an existing OpenAM deployment
– Configuration of a OpenAM site that includes two OpenAM instances as mentioned above
– Installation and Configuration of HA Proxy in a separate Linux Container
– Demonstration of load balancing by HA Proxy to the back end OpenAM Servers
A great deal of information required for doing a demonstration on OpenAM HA environment and in turn the rules to be used by the HA Proxy was picked up from Mark Craig’s blog.
The illustration below might give an idea on the infrastructure used in the video demonstration. There are three Linux Containers in a Ubuntu 14.10 host, one of which has the first instance of OpenAM, the second one has another instance of OpenAM and the third one running HA Proxy to load balance the requests to two instances of OpenAM. The client requests go to the Linux Container running HA Proxy, from where the HA Proxy redirects the requests to either one of the OpenAM instances running in two different Linux Containers.

If you’ve got some some bit of idea looking at the illustration above, I can assure you, it’ll be clearer watching the demonstration below. A word of caution though: the infrastructure used here is only for demonstration purpose, for a very serious highly available environment, you may have to consider other virtualization technologies.
Enjoy!
ForgeRock OpenAM Authentication with Google Account Using OAuth2
ForgeRock OpenAM supports a number of Authentication Modules that can be used to verify the identity of a user attempting to login to the applications protected by OpenAM. One of the biggest strengths of OpenAM is the flexibility that it gives to plug in a Custom Authentication Module in the event the Out of The Box modules do not meet the requirements. Some details around the same can be found here.
In the following video that has a running time of approximately nine minutes, you’ll see an OpenAM instance being configured to contact Google for identifying a user by using OAuth2. Google’s literature about their support for OAuth2 is here in case if you are interested to read.
Enjoy!
Creating OpenAM Realm Using REST
In an earlier post we saw how to create a new realm in ForgeRock OpenAM. But for that we used the Browser User Interface of OpenAM. Well it’s likely that the ForgeRock customers might not be interested in ForgeRock’s implementation of User Interface, but would like to have their own custom way of interacting with the product. For this very purpose, all components of ForgeRock Identity Platform offers easy-to-use RESTful Web API. A neat introduction about it is here. For a detailed look on the RESTful Web Services, I’d recommend ForgeRock documentation.
So in the following screen-cast, we’ll see how we can use a popular command line tool to make REST calls to the OpenAM first for performing authenticaiton and then for creating a realm.
Creating Realm in OpenAM and Configuring OpenDJ as a Data Store
I’ve tried my level best to keep this post as complete in itself as possible to be able to go through without having to read/watch any of my earlier posts/video logs. So while it is not strictly required to read/watch my earlier posts/video logs on this blog to go through this one, at least to understand the infrastructure used, it’s desired that you take a look at a couple of my earlier posts on OpenAM and OpenDJ at the links below:
– ForgeRock OpenDJ Installation In a Linux Container
– ForgeRock OpenAM Installation In a Linux Container
Here’s what you can expect from the screen-cast below
– Creating new realm in OpenAM
– Understanding OpenAM realm based Authentication
– Configuring OpenDJ as a Data Store for the OpenAM realm
Enjoy!
ForgeRock OpenAM – Configuring Policies to Protect Web Applications
In an earlier post we saw the Installation and Configuration of ForgeRock OpenAM and how it protects a Web Based Application. The follow screen-cast, which is an extract from a live session conducted for a ForgeRock Customer takes us through the Policy Configuration in OpenAM so that the Web Application displayes a particular page only to those Users who belong to an OpenDJ group called ‘Employees’:
Enjoy!
ForgeRock OpenAM Installation in a Linux Container
In continuation to my earlier blog on Installing ForgeRock’s OpenDJ in a Linux Container, and to keep up with the promise of doing my bit to introduce ForgeRock’s software stack, I present here another set of video logs that takes you through the deployment of ForgeRock’s Access Management Solution:
– Installation of Apache Web Server in a Linux Container [Video 00]
– Installation of Apache Tomcat Application a Linux Container [Video 01]
– Deploying ForgeRock OpenAM in a Tomcat Application Server [Video 02]
– Protecting Apache Web Server using ForgeRock OpenAM [Video 03]
[Video 00]
[Video 01]
[Video 02]
[Video 03]